If you have seen any of my security presentations or attended any security talks hosted by Troy Hunt, you will be familiar with the Wi-Fi Pineapple. This is a small rogue access point that you can deploy within a couple of minutes and cause havoc with the Wi-Fi connections of the people around you. Hak5, the creators of the Pineapple have now updated their product line with the new Wi-Fi Pineapple Nano.
The main reason for the update is the scarcity of the components that made up the Mark V and also the methods used by people who use the Mark V have changed. So the new Nano addresses these concerns with new radios and a new form factor.
I ordered mine from the US on the 20th of December, and I had it in my hands on the 24th of December in Ireland. So here is my review of the new Wi-Fi Pineapple Nano
NOTE: The Wi-Fi Pineapple Nano is available as a developer kit right now as Hak5 are waiting for SAR certification. This means that its not official yet but the hardware is V1.0 and ready to use. If you are buying this type of equipment right now, it shouldn’t make any difference to you but Hak5 have to tell you this.
What's in the box?
Opening the box you see straight away the new Nano form factor nicely cradled in protective foam. Under that is a USB Y-Cable for powering the device, 2 RP-SMA antennas and a very small instruction card. I picked up the Tactical edition which includes a Pineapple Juice 4000 battery pack, an attachable pouch and a morale patch.
![WP_20160101_14_37_31_Pro_thumb[1] WP_20160101_14_37_31_Pro_thumb[1]](https://blogger.googleusercontent.com/img/b/R29vZ2xl/AVvXsEj9Cpvh1JO2KonlKDwnQUPtFsVg3qPbC1jktwLiDXRy2cMcL1T8uYiNCcPdaRrPu20Xgm1Pjz6476_Do2lfGADQsCmZI0zhmJIO6qxerpIF5NCBIZmlm1kE1V1kr2wC9HN2wivr9gIZlw/?imgmax=800)
With a standard issue external hard disk for scale
![WP_20160101_14_37_03_Pro_thumb[2] WP_20160101_14_37_03_Pro_thumb[2]](https://blogger.googleusercontent.com/img/b/R29vZ2xl/AVvXsEhG1-6OO2JBfSZAU_hviRKwVdMjXkYtCZlJaxhJWQZY2GonOCMU2OuMXjAFGJIeSgh9X2C_4TL6_Y-A3kArxx7kxR-ymBGnDAZxEntR7isEeCGLThrAJI8UFqLp3CBoDHW7LsI9CvyZsg/?imgmax=800)
Nano in its protective foam
![WP_20160101_14_37_54_Pro_thumb[1] WP_20160101_14_37_54_Pro_thumb[1]](https://blogger.googleusercontent.com/img/b/R29vZ2xl/AVvXsEhhOVbnUvUxdPHgx2eq8mo35NvkL3S0EL1Wa_0fE136nM84z-GNxTB9tRKa_DXcAqtn9TCMU8Cgwe3y2rCA5u5p9yLwUFI-RRlXaKrhZF2dFQ91BfDDA30AvmgEKJLvVBxdYyt0NQ5Asw/?imgmax=800)
Unboxed and with an external hard disk for scale
![WP_20160101_14_38_34_Pro_thumb[1] WP_20160101_14_38_34_Pro_thumb[1]](https://lh3.googleusercontent.com/-5ndGOvOuRYY/VoaJJKuMvUI/AAAAAAAACKc/8m2MgvxWbyo/WP_20160101_14_38_34_Pro_thumb%25255B1%25255D_thumb%25255B4%25255D.jpg?imgmax=800)

The device has 2 Atheros high gain radios and a USB Ethernet adaptor. With the new USB Ethernet adaptor interface, you can power the device from your PC. It also means that the device can be used by mobile phones that have support for USB Ethernet such as Android devices. This makes the Nano much more mobile and easier to use in public places.
Setup
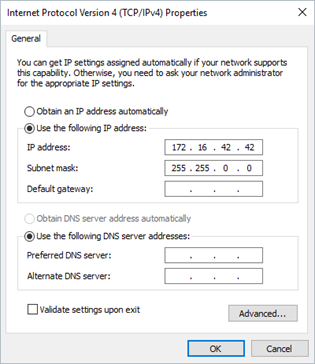
Setting up the device is a lot easier than it was with the Mark V. You just plug it in and it automatically assigns itself the correct IP address as compared to the Mark 5 where you have to reconfigure the network settings.
You can go to http://www.wifipineapple.com/nano to get the latest walkthroughs on setup and also a copy of the latest firmware for the device.
On first browse to the Admin page, you are greeted with an update to the latest firmware page. The page advises to turn off the Wi-Fi radios using the multi function reset button. A quick press turns off the radios and you can upload the latest firmware. It is a similar process to the Mark V after that. You create a new root password, SSID and password for it. Once that is done you log in to the new Admin UI.
Admin UI
The new admin dashboard is a change from the existing Pineapple Mark IV and V UIs. Its white for a start and not panel driven as in the previous incarnations. This both good and bad and I will go through these points later.
![dashboard_thumb[1] dashboard_thumb[1]](https://blogger.googleusercontent.com/img/b/R29vZ2xl/AVvXsEi_uBWkhWSRYPpgfCbRxKUGPbP2hkbnRHy1PMO00dwJEXjDeJgMKCibyQaGlXSA18zqd6Fho33qT2dq5uvkl04gshQH5te7V1RE-ZZ608abVMn5cnHu-AS5BFKgETKwCr7QfR4tl0yJDg/?imgmax=800)
The menu on the left shows all the different areas that you can play with. One of the major improvements is you get a responsive design in the UI and it will work on mobile devices.
One of the issues I have found with the new UI is that unlike the previous black UI, this version does not auto refresh so you will need to manually refresh the page to see the uptime, new SSIDs in the pool etc. I am guessing with such an early release this will be fixed in newer updates.
On the new PineAP menu you have the configuration for the powerful PineAP features. This is what allows you to spoof SSIDs and also attract devices to your access point instead of the real ones.
![pineap_thumb[2] pineap_thumb[2]](https://blogger.googleusercontent.com/img/b/R29vZ2xl/AVvXsEgjmxwsYjkIp77E0jMFPAxPrEZcBYYM6fJsysEwLgL6OO964f0qwMO8EWM1MKULyAnzEd0R52aLn4FNLhPyyLO5YERtFSC3mHFQrPqb00Z6FOkpPlpDFAJ9xUNtt2iT3azaKKkelhEbLQ/?imgmax=800)
You need to enable the PineAP Daemon if you want to use the additional options below it such as Beacon Response and Broadcast SSID pool. The SSID broadcast is one of the most useful features in the whole Wi-Fi Pineapple arsenal as you can create a custom SSID list with the most common SSIDs in use, which can be hotels and airports in the area. Hotels chains normally use the same Wi-Fi name so their customers will have an easier time connecting. All the better for me!
![reporting_thumb[1] reporting_thumb[1]](https://blogger.googleusercontent.com/img/b/R29vZ2xl/AVvXsEjYcuh5p5yoSJSwVpiiTZgc6YoG0yU0nzfh9gu_ixVrgiqbgINSV7YGJMo2a5z7gFwNP7Ll98aHkjB8n2xlThfQYBpDbmXy95PN420DDb8RdhZgp9AspuTp-QSM896CESqL1rA5rpr25A/?imgmax=800)
The new reporting module is what really struck me. For extended engagements, you can get reports emailed to you and also paint a picture when you are doing recon for a penetration test. Stick this device under a desk in a cable mounting and it will work away happily sending you information.
Overall thoughts
The Nano is not the successor to the Mark V but an update of the existing concept. It is wrapped in a new form factor, more portable but it is still limited to the 2.4GHz range. The very recently announced Wi-Fi Pineapple Tetra will allow both 2.4GHz and 5GHz in the one box and looks more like the Pineapple Mark VI.
Does that mean that the Nano is already out of date. No!. It still serves a very handy purpose. More devices operate on the 2.4GHz frequency than are on the 5GHz and I don’t know off the top of my head if any devices work exclusively in the 5GHz band. For portability, this device is excellent and it is also discrete in comparison to the Mark V which is saying something considering how small the Mark V is.
Depending on your usage requirements and your attack scenarios, the Nano will make more sense than the Mark V or the Tetra.
If you are in Oslo for the ProgramUtvikling Security Day, you will get a chance to see the device up close and have a play with it.


![WP_20160101_14_37_31_Pro_thumb[1] WP_20160101_14_37_31_Pro_thumb[1]](https://blogger.googleusercontent.com/img/b/R29vZ2xl/AVvXsEj9Cpvh1JO2KonlKDwnQUPtFsVg3qPbC1jktwLiDXRy2cMcL1T8uYiNCcPdaRrPu20Xgm1Pjz6476_Do2lfGADQsCmZI0zhmJIO6qxerpIF5NCBIZmlm1kE1V1kr2wC9HN2wivr9gIZlw/?imgmax=800)
![WP_20160101_14_37_03_Pro_thumb[2] WP_20160101_14_37_03_Pro_thumb[2]](https://blogger.googleusercontent.com/img/b/R29vZ2xl/AVvXsEhG1-6OO2JBfSZAU_hviRKwVdMjXkYtCZlJaxhJWQZY2GonOCMU2OuMXjAFGJIeSgh9X2C_4TL6_Y-A3kArxx7kxR-ymBGnDAZxEntR7isEeCGLThrAJI8UFqLp3CBoDHW7LsI9CvyZsg/?imgmax=800)
![WP_20160101_14_37_54_Pro_thumb[1] WP_20160101_14_37_54_Pro_thumb[1]](https://blogger.googleusercontent.com/img/b/R29vZ2xl/AVvXsEhhOVbnUvUxdPHgx2eq8mo35NvkL3S0EL1Wa_0fE136nM84z-GNxTB9tRKa_DXcAqtn9TCMU8Cgwe3y2rCA5u5p9yLwUFI-RRlXaKrhZF2dFQ91BfDDA30AvmgEKJLvVBxdYyt0NQ5Asw/?imgmax=800)
![WP_20160101_14_38_34_Pro_thumb[1] WP_20160101_14_38_34_Pro_thumb[1]](https://lh3.googleusercontent.com/-5ndGOvOuRYY/VoaJJKuMvUI/AAAAAAAACKc/8m2MgvxWbyo/WP_20160101_14_38_34_Pro_thumb%25255B1%25255D_thumb%25255B4%25255D.jpg?imgmax=800)

![dashboard_thumb[1] dashboard_thumb[1]](https://blogger.googleusercontent.com/img/b/R29vZ2xl/AVvXsEi_uBWkhWSRYPpgfCbRxKUGPbP2hkbnRHy1PMO00dwJEXjDeJgMKCibyQaGlXSA18zqd6Fho33qT2dq5uvkl04gshQH5te7V1RE-ZZ608abVMn5cnHu-AS5BFKgETKwCr7QfR4tl0yJDg/?imgmax=800)
![pineap_thumb[2] pineap_thumb[2]](https://blogger.googleusercontent.com/img/b/R29vZ2xl/AVvXsEgjmxwsYjkIp77E0jMFPAxPrEZcBYYM6fJsysEwLgL6OO964f0qwMO8EWM1MKULyAnzEd0R52aLn4FNLhPyyLO5YERtFSC3mHFQrPqb00Z6FOkpPlpDFAJ9xUNtt2iT3azaKKkelhEbLQ/?imgmax=800)
![reporting_thumb[1] reporting_thumb[1]](https://blogger.googleusercontent.com/img/b/R29vZ2xl/AVvXsEjYcuh5p5yoSJSwVpiiTZgc6YoG0yU0nzfh9gu_ixVrgiqbgINSV7YGJMo2a5z7gFwNP7Ll98aHkjB8n2xlThfQYBpDbmXy95PN420DDb8RdhZgp9AspuTp-QSM896CESqL1rA5rpr25A/?imgmax=800)


